Containerisation and Docker in HPC
SETTING UP AND USING CONTAINERISED PROGRAMS ON YOUR CLOUD INSTANCE
Welcome to HPC blog number 2! This article is all about providing you with the steps and knowledge to use docker on a linux machine (be it a cloud instance like AWS, or a cluster and anything else). For this article we will be using a cloud instance on AWS that is following on from blog 1 (if you haven’t followed through blog 1, feel free to go through that and then come back to this).
So, Docker is a containerisation program. It allows compact packaging of software with the OS libraries and dependencies required for the software to run. Using containers gives ease of transport of software from machine to machine during development of a program. Furthermore, anywhere docker is installed the docker image can run; this makes it both OS and architecture agnostic.
In the container-space we call a bundled environment and application an image, and an image we are running a container. Think of it like the image is the so-called blueprint for the container. To see a wide range of images available on docker, check out https://hub.docker.com/
For more documentation on docker check out the docker documentation: https://docs.docker.com/
THERE ARE ALSO OTHER CONTAINER DISTRIBUTION ENGINES LIKE:
Podman: https://podman.io/
OpenVZ : https://openvz.org/
Which you may come across in your HPC journey, but given that docker is most popular, we will be working with that. Now, with that quick introduction out of the way, Let’s get right into it!
After booting up terminal and sshing into your AWS instance from blog 1, input the following commands into the terminal prompt.
AWS-Instance:~> sudo yum update
AWS-Instance:~> sudo yum upgrade
—------------- UPDATE OCCURRING —----------------
AWS-Instance:~> sudo amazon-linux-extras install docker
AWS-Instance:~> sudo usermod -a -G docker ec2-user
Provided each command runs smoothly, docker should be all set up and ready for use.
Note: To get the new permissions granted by the usermod command, you need to log out of the ssh and re enter for the session to update.
We also need to ensure that the docker daemon is enabled and starts on startup too, following this the hello world command will check docker is working as intended.
sudo service docker start
sudo systemctl enable docker
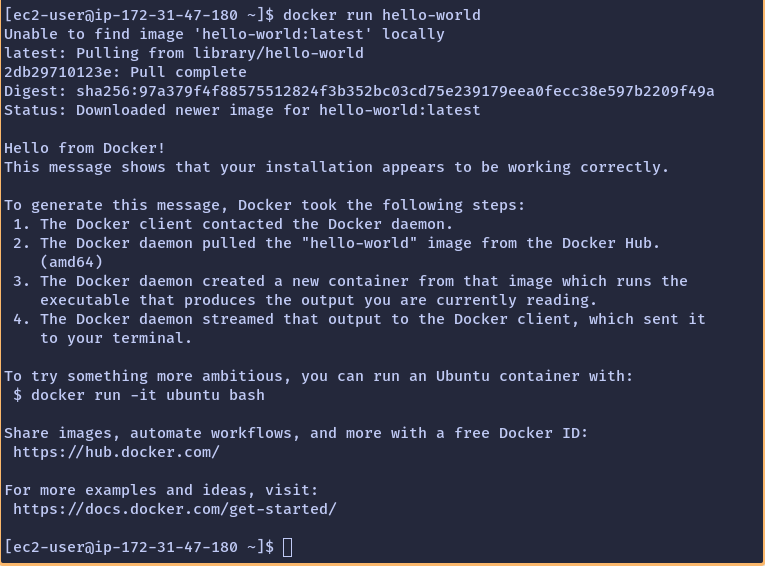
docker run hello-world
This is the expected output of the hello-world:
Now we have docker installed, there are many options to be taken, docker images can be launched in an interactive terminal by using the command:
docker run -it <image name>
If you were to use it to launch an alpine linux container (which is a super lightweight distribution of the operating system) it would look like this:
docker run -it alpine sh
What we have done here is launch a shell within the alpine linux container, where we can then install software manually inside the container. This can also be useful in an environment where docker is installed but you do not have admin privileges, so you can effectively create a container and install software into that.
Anyways, instead of a manual interactive shell environment, we can utilise docker files to automate the creation of an image, then we can create a container from the image.FROM
We can user vim or nano to create the file:
nano Dockerfile
The contents should be:
FROM alpine
RUN apk add --update python3 py3-pip python3-dev
RUN pip install cython
CMD ["/usr/bin/python3", "--version"]
This file should be named “Dockerfile” in its own directory within your AWS instance
Then we run the command to build and tag our local image:
sudo docker build <directory> -t <tagname>
Now to run a container from the image:
Sudo docker run -rm <tagname>
This image should run and print out the python version to the command line.
Congrats, docker is all set up and the basics are yours to play with and explore the ecosystem! But don’t go yet, now we are going to set up a tool that will play into the rest of the blog series!
Don't forget to check out the docker documents to see more about what a dockerfile can do.
Seashells is a utility that can pipe terminal output to a webpage for easy viewing on your phone or elsewhere. We are going to set up this tool so that the terminal can be viewed by you from another device to monitor the instance while it’s completing longer tasks.
Firstly use the command:
cp <directoryname>/Dockerfile TermView
To copy the old docker file to a new directory so we can edit it without losing the configuration of our old one:
FROM alpine
RUN apk add --update python3 py3-pip python3-dev git
RUN pip install cython seashells
RUN git clone https://github.com/mwharrisjr/Game-of-Life
We have no CMD line here as we will be using an interactive terminal session to use the tools we have installed.
After building the container with:
docker build TermView -t conway
We then want to:
docker run -it conway sh
to have an interactive terminal within the container.
Once inside the container, I like to run an ls command to see where we are, you should be in the root folder. Provided the container is properly set up, you should see a folder called Game-of-Life, run the commands:
cd Game-of-Life/script
python3 main.py | seashells -delay 10
Then click the seashells link to open the webpage in your browser.
Follow the prompts by the tool in the terminal to set up the game of life (numbers of rows and columns (40, 40 is a good start) then watch on your browser as the cells evolve over time. ( the vision can be choppy so have aplay, also, you can pipe any terminal command to seashells so do not stop with this, use apk to download more tools to the container and have some fun!
Congrats! Docker is all set up and we can view the terminal from the web, this is going to play into some upcoming blogs so keep your eyes peeled. Until then though; Next week’s blog is all about HPC as a tool in the real world!


